Continuous Delivery with Sitecore Revisited – Team City
Contents
- 1 Team City Step 1 – Restore NuGet Packages
- 2 Team City Step 2 – GitVersion
- 3 Team City Step 3 – Build Solution and Run OctoPack
- 4 Team City Step 4 – Run Unit Tests and Code Coverage Analysis
- 5 Team City Step 5 – Package Serialized Items
- 6 Team City Step 6 – Create Release
- 7 Team City Step 7 – Deploy Release
- 8 Team City Step 8 – Run UI Tests
- 9 Source Control Root
- 10 VCS Labelling
- 11 Team City Parameters
Last year I wrote two posts about Continuous Delivery with Sitecore Continuous Delivery with Sitecore Part 1 and Continuous Delivery with Sitecore Part 2
Since then I’ve tweaked the deployment process and made significant changes to the solution being deployed, we refactored to be more inline with Sitecore’s Helix standards, I gave a talk about this at the Sitecore User Group in Cardiff, and changed our item serialization provider, so I wanted to share an update of how the process looks now.
The deployment tools are the same so we use Team City for CI and building our release and Octopus Deploy to push the releases through our environments.
The overall process for the release build looks like this:-
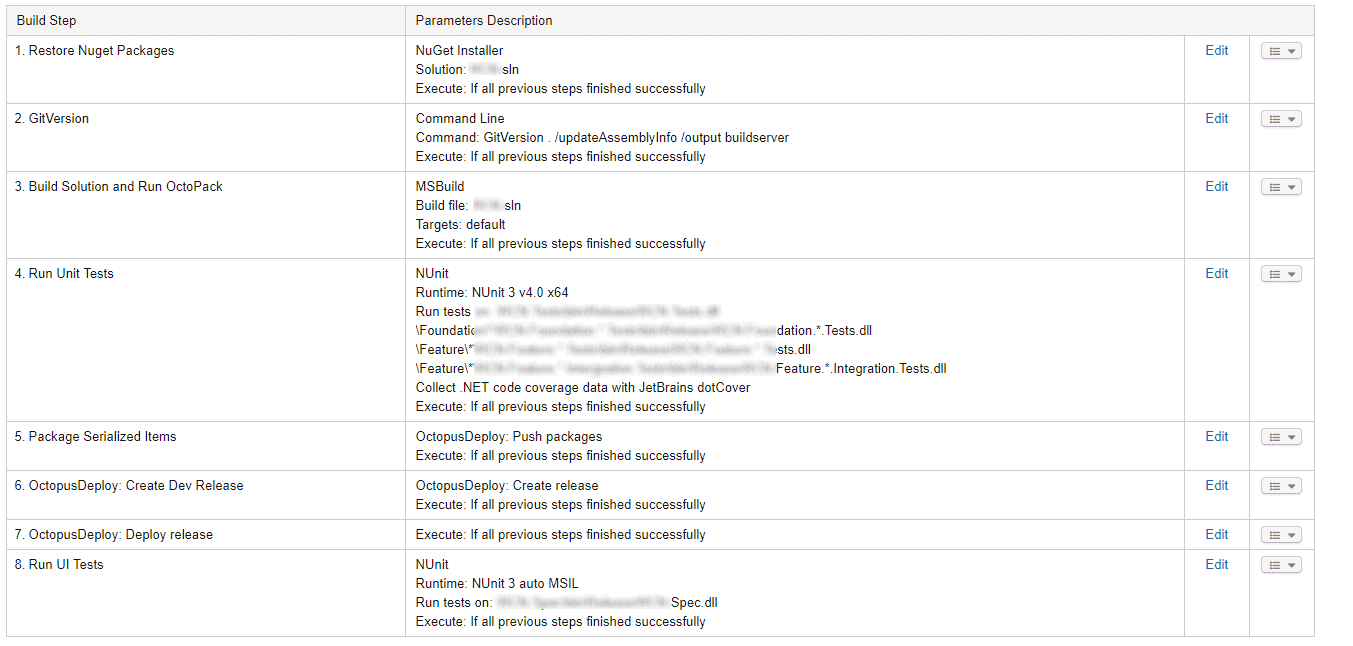
Below I will go into more detail about each step and pick out some of the key settings.
Team City Step 1 – Restore NuGet Packages
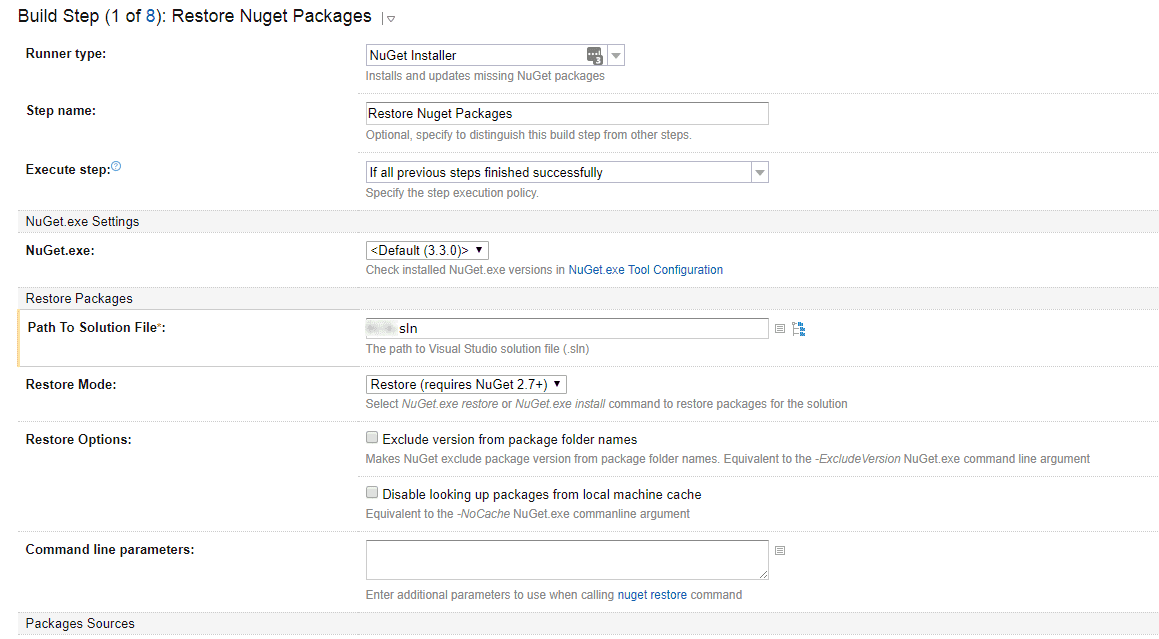
This step uses the** NuGet Installer** runner and you need to provide the Path to Solution parameter for your *.sln file so it can fetch your NuGet packages on the build server.
Team City Step 2 – GitVersion
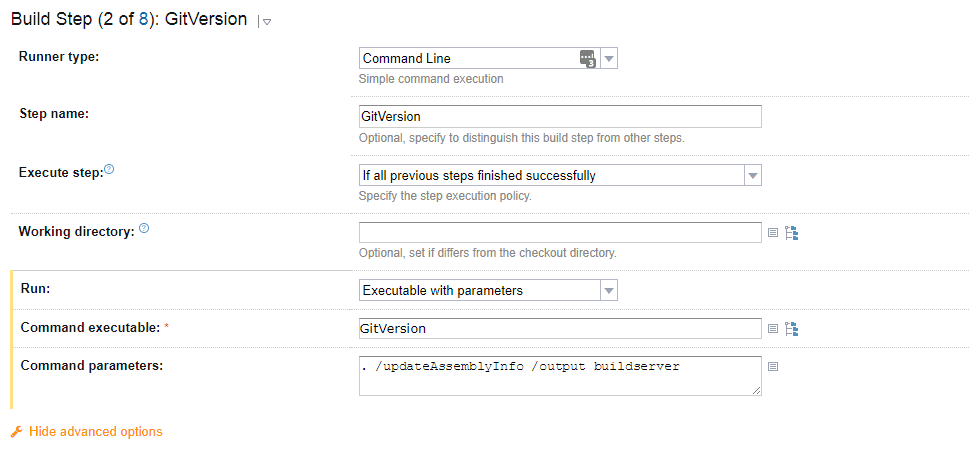
GitVersion enables Easy Semantic Versioning in your release pipeline, I’ve gone in to more details in another post here or you can checkout the GitHub repo for more details https://github.com/GitTools/GitVersion, this step requires the GitVersionTask Nuget package.
The main setup for Team City is adding a Command Line runner, the Command executable is GitVersion and the Command Parameters are
. /updateAssemblyInfo /output buildserver
Parameters for GitVersion
GitVersion also requires you create several parameters so it can populate them when this task is executed, you can then use them for the rest of the build process

system.Git_Branch – Is your branch TeamCity is using for the build, you will get autocomplete on this as its a TeamCity parameter.
system.GitVersion.FullSemVer – FullSemVer will also include build metadata: {major}.{minor}.{patch}-{tag}+{buildmetadata}
system.GitVersion.NuGetVersion – NuGetVersion variable to have the version formatted in a NuGet compatible way, so 1.0.1-rc.1+5 would become 1.0.1-rc0001
system.GitVersion.SemVer – SemVer will be in the format {major}.{minor}.{patch}-{tag}
Team City Step 3 – Build Solution and Run OctoPack
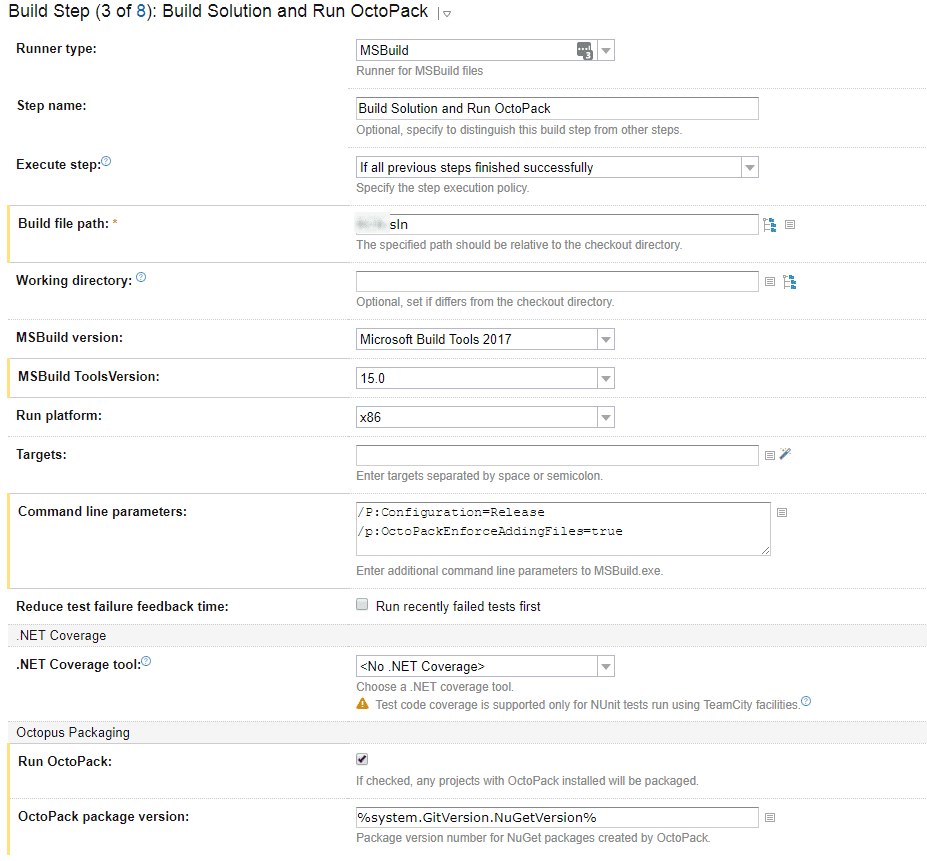
This step uses the MSBuild runner type, two parameters are passed to this /P:Configuration=Release to run a release build and /p:OctoPackEnforceAddingFiles=true.
From the OctoPack documentation – https://octopus.com/docs/packaging-applications/nuget-packages/using-octopack
If the
<files>section exists, OctoPack by default won’t attempt to automatically add any extra files to your package, so you’ll need to be explicit about which files you want to include. You can override this behavior with/p:OctoPackEnforceAddingFiles=truewhich will instruct OctoPack to package a combination of files using its conventions, and those defined by your<files>section.
We are also running OctoPack here, you can see the checkbox enabled and using the TeamCity parameter %system.GitVersion.NuGetVersion% for the build number that was populated in step two.
Team City Step 4 – Run Unit Tests and Code Coverage Analysis
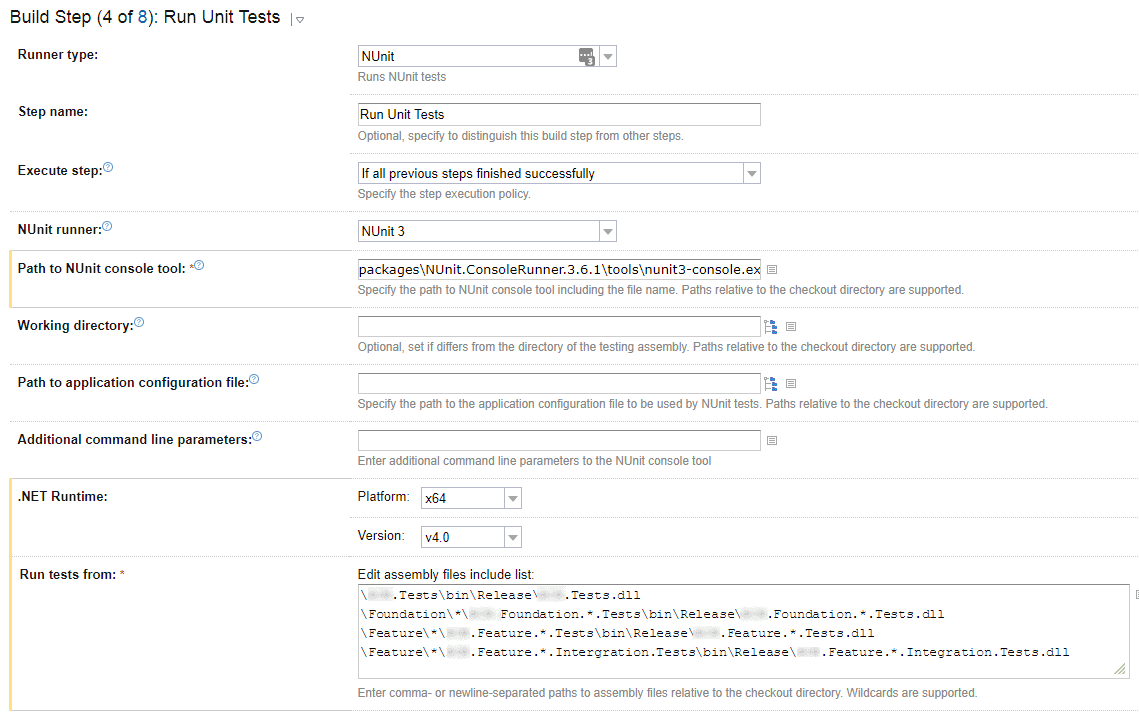
We are using NUnit for our tests so we use the built in NUnit runner task, plug in the path the the NUnit console tool referenced from NuGet, packages\NUnit.ConsoleRunner.3.6.1\tools\nunit3-console.exe.
In the Run tests from field wildcards are your friend, Helix has a consistent project and folder structure you can use this consistency to ensure any new Feature or Foundation test project is picked up without having to make changes on the build server. We dropped the code folder from the helix guidelines so our paths are as follows
\Foundation\*\{YourCompany}.Foundation.*.Tests\bin\Release\{YourCompany}.Foundation.*.Tests.dll
\Feature\*\{YourCompany}.Feature.*.Tests\bin\Release\{YourCompany}.Feature.*.Tests.dll
\Feature\*\{YourCompany}.Feature.*.Intergration.Tests\bin\Release\{YourCompany}.Feature.*.Integration.Tests.dll
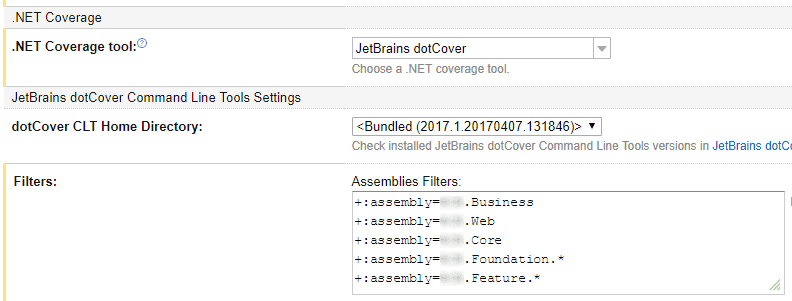
We also run Code Coverage Analysis as part of this step with dotCover, again wild cards and a consistent naming convention are your friends as you tell dotCover which assemblies to run coverage against.
Team City Step 5 – Package Serialized Items
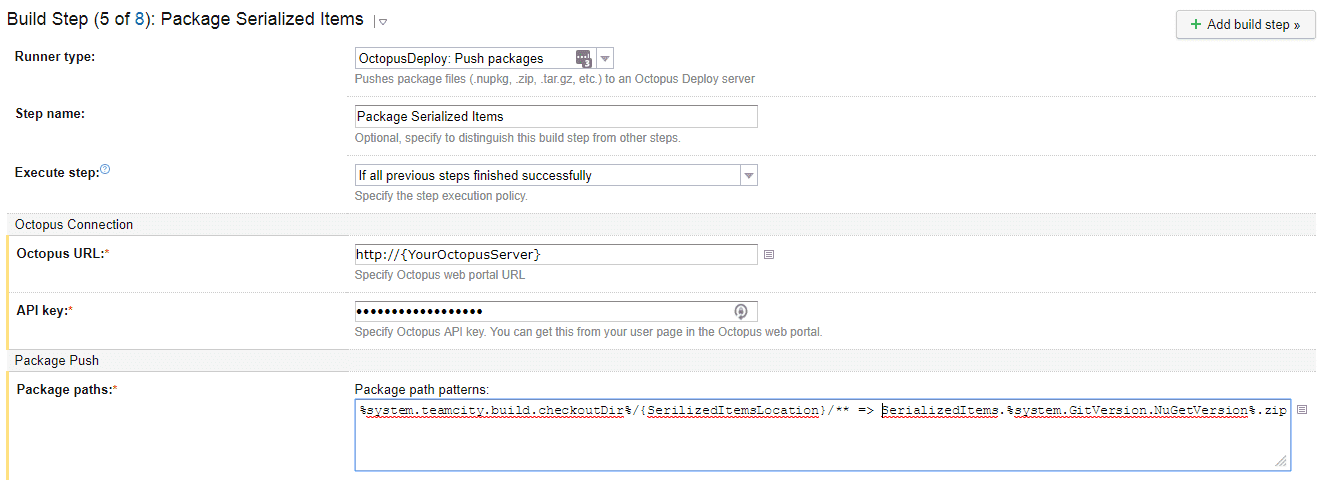
We are using Unicorn by Sitecore MVP Kam Figy for items serialization, this step uses the Push Packages runner from the Team City plugin by Octopus Deploy.
We are grabbing the serialized items on the build server and creating a zip file using the %system.GitVersion.NuGetVersion% parameter populated earlier by GitVersion Task.
%system.teamcity.build.checkoutDir%/{SerilizaedItemsLocation}/** => SerializedItems.%system.GitVersion.NuGetVersion%.zip
Team City Step 6 – Create Release
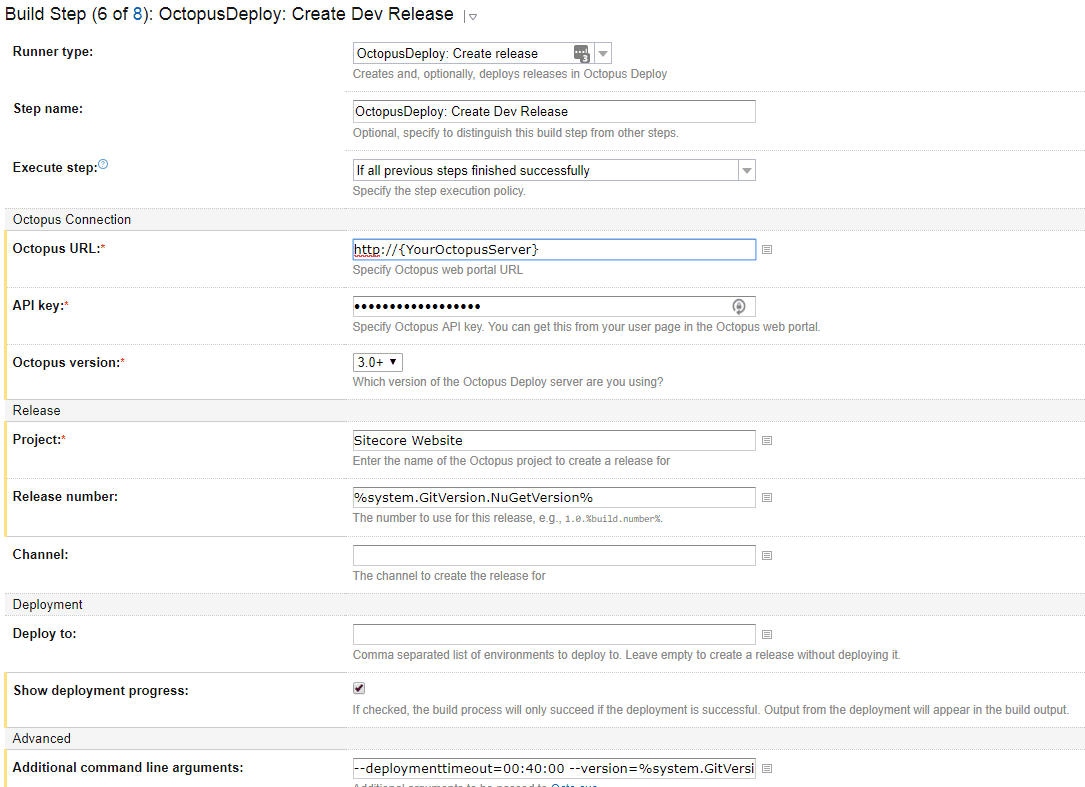
This step is also from the Team City plugin from Octopus Deploy, the ** OctopusDeploy: Create Release** runner as it sounds lets you create a release in Octopus directly from Team City, the project name should match the name you use in Octopus Deploy, the release number uses the_ %system.GitVersion.NuGetVersion%_ parameter again.
We also pass additional parameters as follows, you can read more about them here
--deploymenttimeout=00:40:00 --version=%system.GitVersion.NuGetVersion% --packageVersion=%system.GitVersion.NuGetVersion% --ignoreexisting
Team City Step 7 – Deploy Release
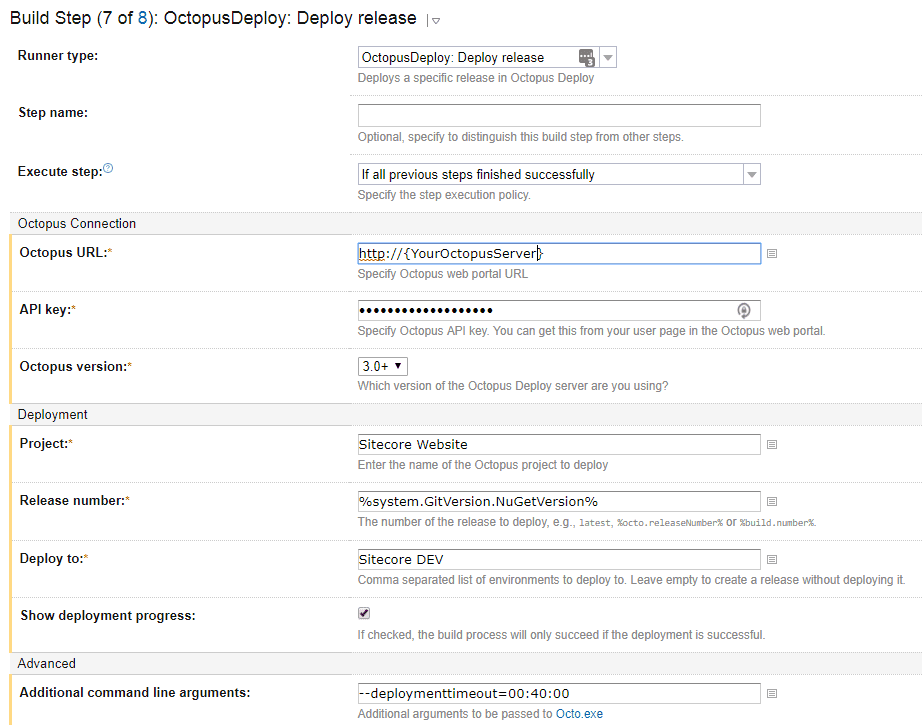
This step is also from the Team City plugin from Octopus Deploy, the OctopusDeploy: Deploy Release runner lets you deploy a Octopus release directly from Team City. Plug your Project and Environment name from Octopus Deploy here to deploy the release created in the previous step.
Team City Step 8 – Run UI Tests
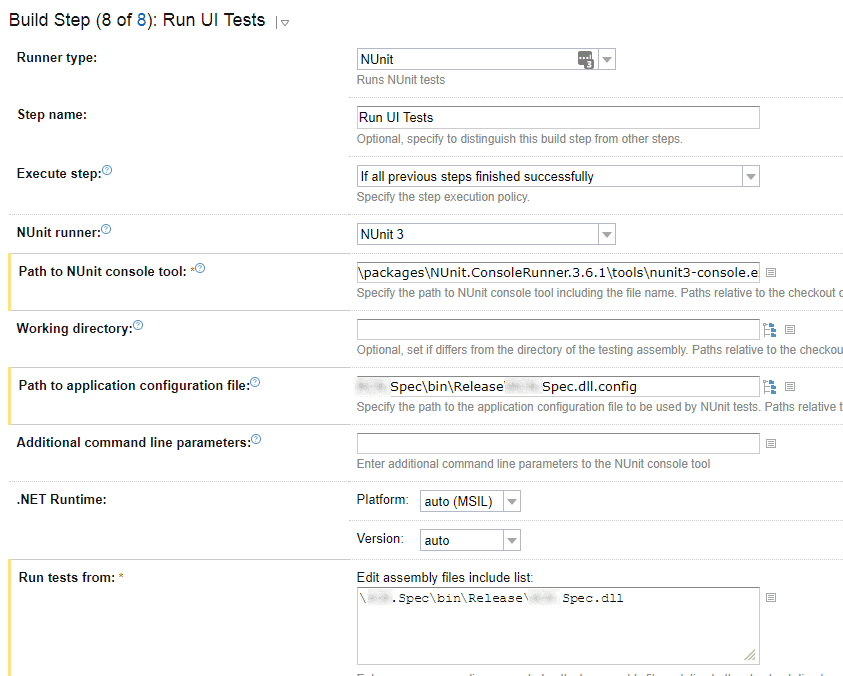
This step use the NUnit runner again, this time we execute another test library that runs selenium tests against the site we have just deployed. Plug in the path the the NUnit console tool reference from NuGet, eg packages\NUnit.ConsoleRunner.3.6.1\tools\nunit3-console.exe.
Path to application configuration file is as it sounds the path to the config for your test assembly in the Run Tests from field add the path to your test assembly.
Source Control Root
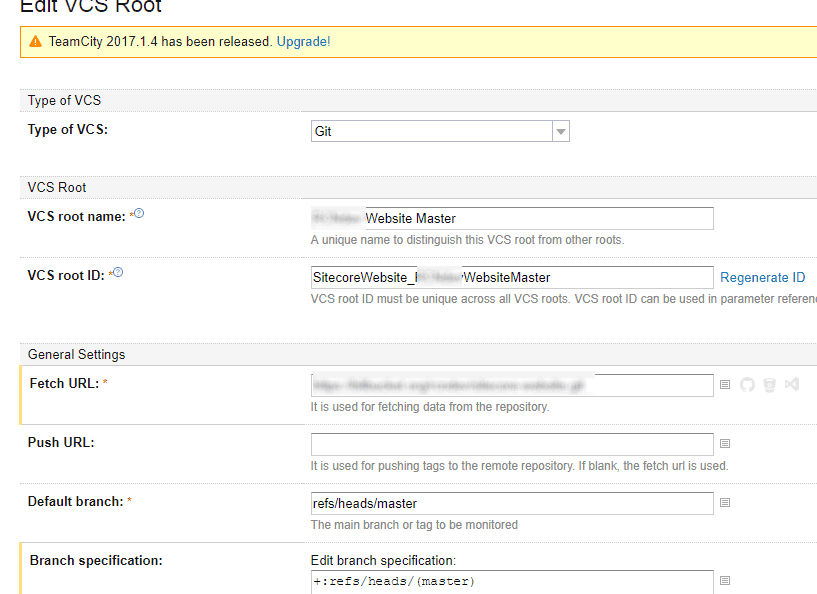
Set this up to point to your source control repo in the Fetch URL field and add your branch specifications, as this build is a release build we deploy our master branch.
VCS Labelling
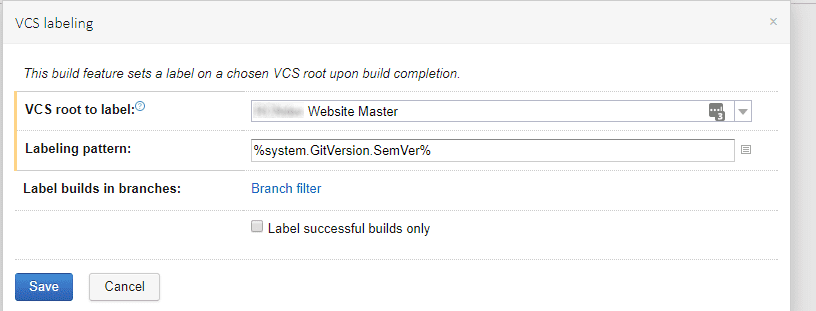
This build feature allows you to label you the commit you have just created, this is then used by GitVersion when calculating the next release number.
Team City Parameters
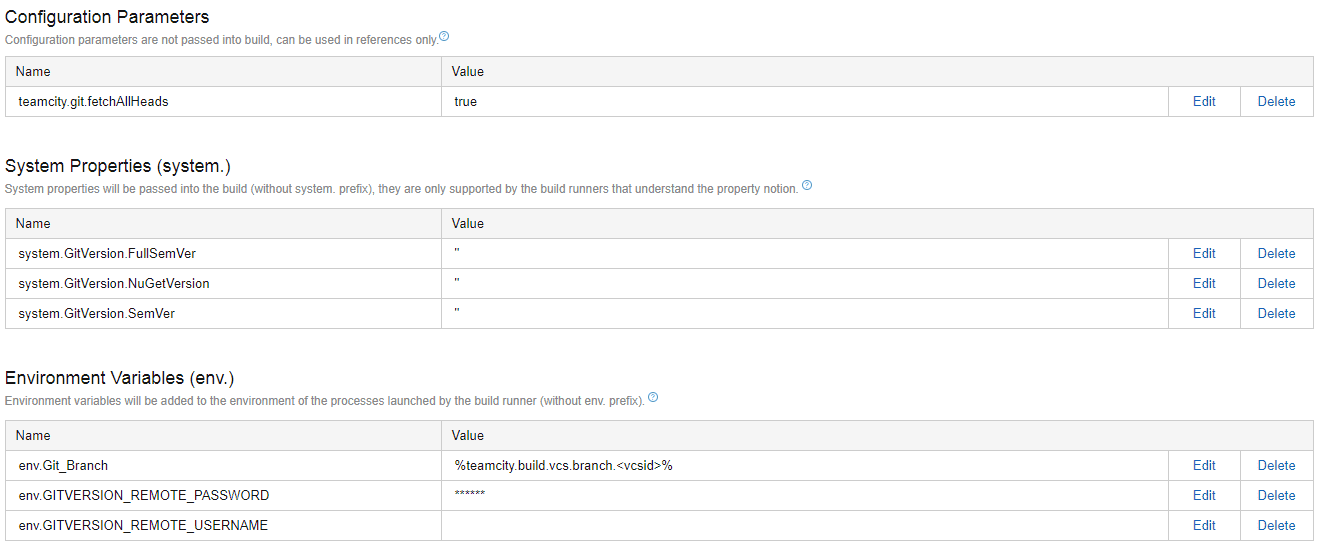
The rest of the parameters we have set up in Team City, mostly for GitVersion.
teamcity.git.fetchAllHeads = true got around an issue we ran into calculating release numbers when we were deploying of something other than our master or develop branch.
Part two will follow detailing the Octopus Deploy setup.